Every Documentation Site needs its own web address, and the Create new site wizard offers two ways to get one:
- On a ClickHelp subdomain — ClickHelp creates the address for you, and the site works almost immediately. Choose this if you don't have a domain of your own, don't have access to a DNS panel, or just want to try a multi-site setup quickly.
- On your own domain — readers reach the site at an address under your brand, such as docs.hedronlabs.org. Choose this for a public-facing site that is part of your company's web presence. You add a CNAME record for the domain yourself before you start.
A portal can have sites of both kinds at the same time.
| A site on a ClickHelp subdomain is a different way to get an address, not an extra site slot. Such sites count toward the site limit of your license in the same way as sites on your own domain. |
Adding a Site on a ClickHelp Subdomain
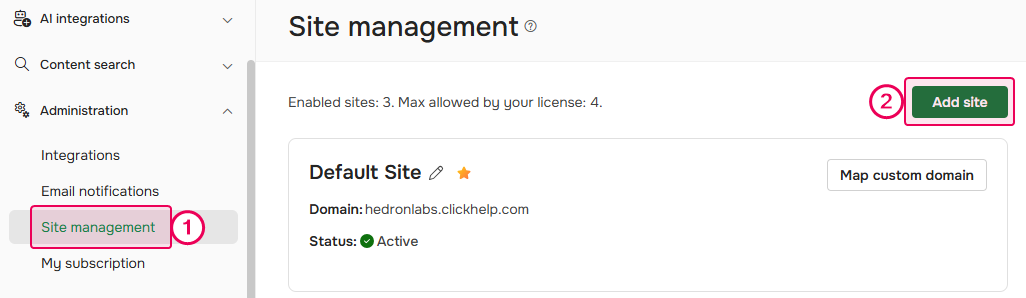
- Go to Settings → Administration → Site management.
-
Click Add site.
- Select Subdomain.
-
Enter a Name for the site.
The site name is an internal identifier and is not visible to readers. -
Enter a name for the subdomain. It becomes the first part of the address, and the wizard shows the resulting address below the box — for example, support on the hedronlabs.clickhelp.co portal gives support.hedronlabs.clickhelp.co.
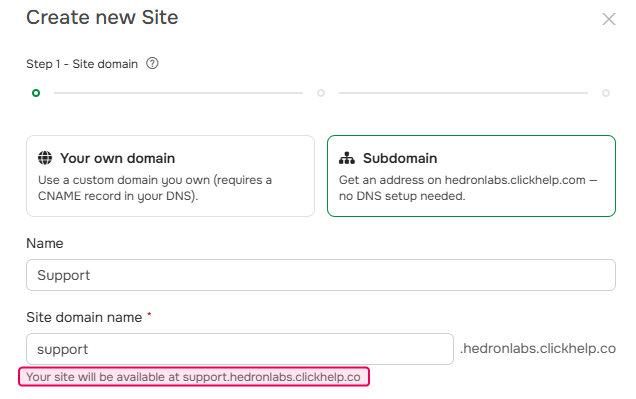
A subdomain name can contain lowercase letters, digits, and hyphens, but cannot start or end with a hyphen. The maximum length is 63 characters. Uppercase letters are converted to lowercase automatically. Each subdomain name must be unique among the sites of your portal. - Click Next.
- At the Certificate type step, Let's Encrypt is already selected. It is issued and renewed automatically and is the only certificate type available for sites on a ClickHelp subdomain, so the Custom option is unavailable.
- Click Next.
- Wait for the last step to finish. Once the Let's Encrypt certificate is applied, we send you an email.
- Click Finish.
As a result, the site is available at its subdomain address. ClickHelp creates the DNS record for it, so you don't add a CNAME record yourself and don't check whether it has applied. Custom SSL certificates are available only on your own domain.
Adding a Site on Your Own Domain
| Before you start, add a CNAME record that points your domain to the portal, as described in Custom Domain Name for Your Portal. DNS records may take several hours to apply. |
- Go to Settings → Administration → Site management.
- Click Add site.
- Select Your own domain.
-
Enter a Name for the site.
The site name is an internal identifier and is not visible to readers. - Enter the domain of the site, for example docs.hedronlabs.org.
- Click Check DNS record to verify the record. The check may take some time.
- Click Next after the check is complete.
-
Select the type of SSL certificate:
- Let's Encrypt — a free certificate that is issued and renewed automatically.
- Custom — a purchased certificate with manual renewal. Upload the certificate in the PFX format and enter its password. If no password is required, leave the box empty.
- Click Next.
- The last step of the wizard shows the result of the setup. If you selected the Let's Encrypt certificate, the process of getting the certificate starts, and we send you an email once it is applied.
- Click Finish.
As a result, the site is available at your domain.
After You Add a Site
You can now assign publications to the new site. It receives a one-time copy of settings from the default site, and you can then customize its look & feel, custom pages, and other site-specific settings independently.
| You cannot delete a site, but you can disable it. Choose the address carefully before you create the site. |